> For the complete documentation index, see [llms.txt](https://att.vr42.com/llms.txt). Markdown versions of documentation pages are available by appending `.md` to page URLs; this page is available as [Markdown](https://att.vr42.com/basic/activities/carpentry.md).
# 木工
## 工作地点
**Carpentry** can only be performed in the [Carpentry Workshop](https://townshiptale.fandom.com/wiki/Carpentry_Workshop).
## 教程
### 如何制作木制品
[**Tools**](https://townshiptale.fandom.com/wiki/Tool) **and Materials Required**
-[Chisel](https://townshiptale.fandom.com/wiki/Tool)
-[Hammer](https://townshiptale.fandom.com/wiki/Tool)
-6-18 [Wood](https://townshiptale.fandom.com/wiki/Wood), depending on the number required for the item you are [Crafting](https://townshiptale.fandom.com/wiki/Crafting).
### **说明**
(1) Rip out of the [Book](https://townshiptale.fandom.com/wiki/Book) as a guide.
(2) Put it in the frame of the projector on the [Chisel](https://townshiptale.fandom.com/wiki/Chisel) deck. This will highlight the areas you need to break off in the order required to make the item in the recipe.
(3) Use the [Chisel](https://townshiptale.fandom.com/wiki/Chisel) and [Hammer](https://townshiptale.fandom.com/wiki/Tool) to break off the highlighted portions of the [Logs](https://townshiptale.fandom.com/wiki/Wood). Place the [Chisel](https://townshiptale.fandom.com/wiki/Chisel) on the bark. You should be able to feel haptic vibrations from your controller if you have made contact. Once you've lined up the [Chisel](https://townshiptale.fandom.com/wiki/Chisel), slam the [Hammer](https://townshiptale.fandom.com/wiki/Hammer) against the end of the [Chisel](https://townshiptale.fandom.com/wiki/Chisel).
(4) Once the bark has been removed in the correct order, you are free to [Chisel](https://townshiptale.fandom.com/wiki/Chisel) the softer portion of the [Wood](https://townshiptale.fandom.com/wiki/Wood) in any order to finish the item. Once you've removed the first inner layer after the bark, you will start to see portions of the item you've made. Repeat this step to fully remove all of the soft [Wood](https://townshiptale.fandom.com/wiki/Wood). There are a total of 3 layers. The first layer is the bark, the second layer is the [Logs](https://townshiptale.fandom.com/wiki/Wood) with the bark removed, and the third layer shows part of the item.
### **制作技巧**
-The projector is not required for creating pieces. As long as you remove the bark in the right order, the correct piece will still be created.
-It is possible to use a [Rock](https://townshiptale.fandom.com/wiki/Rock) on a [Stick](https://townshiptale.fandom.com/wiki/Stick) as a makeshift [Hammer](https://townshiptale.fandom.com/wiki/Tool), and a [Flint](https://townshiptale.fandom.com/wiki/Flint) as a makeshift [Chisel](https://townshiptale.fandom.com/wiki/Tool), though these will not be as effective as actual weapons, especially when attempting to carpent higher tiers of [Wood](https://townshiptale.fandom.com/wiki/Wood).
-The better [Material](https://townshiptale.fandom.com/wiki/Metal) your [Carpentry Tools](https://townshiptale.fandom.com/wiki/Tool) are made from, the easier your experience will be when carpenting.
-Try to line your [chisel](https://townshiptale.fandom.com/wiki/Chisel) up under where the bark splits for more leverage. This will make it easier to break the bark off.
### 制作图纸
Use this image as reference to recreate the pattern numbers below.
Warning; All Recipes are currently not shown currectly. -DiscordDrifter
| Page | Description | Resources | Image | Notes | Pattern |
| ------- | ---------------------------------------------------------------------- | ---------------------------------------------------- | ------------------------------------------------------------------------------------------------------------------------------------------------------------------------------------------------------------------------------------------------------------------------------------------------------------------------------------------------------------- | --------------------------------------------------------------------------------------------------------------------------------------------------------------------------------------------------------------------------------------------------------------------------------------------------------------- | -------------------------- |
| Page 1 | Introduction | | | | |
| Page 2 | Basics | |  | | |
| Page 4 | Dice | 6 [wood](https://townshiptale.fandom.com/wiki/Wood) | [](https://static.wikia.nocookie.net/atownshiptale_gamepedia_en/images/3/36/Glyph_Dice.png/revision/latest?cb=20190919162502) | You might accidentally make dice if you freestyle work and fail. | 12 2 1 3 6 11 10 7 4 9 8 5 |
| Page 6 | Short Handle | 6 [wood](https://townshiptale.fandom.com/wiki/Wood) | [](https://static.wikia.nocookie.net/atownshiptale_gamepedia_en/images/5/52/Glyph_Handle-Short.png/revision/latest?cb=20190919162432) | double sided | 2 4 8 12 9 11 1 7 10 6 3 5 |
| Page 7 | Slim Rod | 6 [wood](https://townshiptale.fandom.com/wiki/Wood) | [](https://static.wikia.nocookie.net/atownshiptale_gamepedia_en/images/1/10/Glyph_Rod_Slim_40cm.png/revision/latest?cb=20190919162355) | \~60% more then short handle | 3 10 12 2 1 9 6 4 7 8 11 5 |
| Page 8 | Round Handle | 6 [wood](https://townshiptale.fandom.com/wiki/Wood) | [](https://static.wikia.nocookie.net/atownshiptale_gamepedia_en/images/a/a5/Glyph_Handle_Round_Fist.png/revision/latest?cb=20190919162341) | Has one middle attachment and 4 sides. | 4 9 2 1 10 8 11 7 12 3 6 5 |
| Page 9 | Bowl | 6 [wood](https://townshiptale.fandom.com/wiki/Wood) | [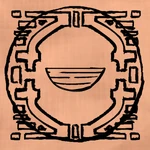](https://static.wikia.nocookie.net/atownshiptale_gamepedia_en/images/f/f4/Glyph_WoodenBowl.png/revision/latest?cb=20190919162329) | One form to carry soup in. | 9 10 2 4 11 1 6 3 8 12 7 5 |
| Page 10 | Ladle | 6 [wood](https://townshiptale.fandom.com/wiki/Wood) | [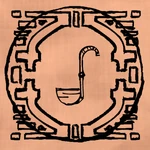](https://static.wikia.nocookie.net/atownshiptale_gamepedia_en/images/3/30/Glyph_WoodenLadle.png/revision/latest?cb=20190919162320) | One way to scoop soup. | 2 4 3 11 7 6 1 9 12 10 8 5 |
| Page 11 | Shield Handle | 6 [wood](https://townshiptale.fandom.com/wiki/Wood) | [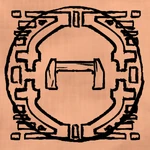](https://static.wikia.nocookie.net/atownshiptale_gamepedia_en/images/e/e2/Shieldhandle.png/revision/latest?cb=20190919162308) | Required piece for a crafted shield. | 4 10 3 8 2 7 6 9 11 1 12 5 |
| Page 12 | Medium Rod | 12 [wood](https://townshiptale.fandom.com/wiki/Wood) | [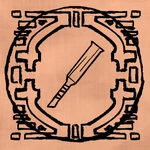](https://static.wikia.nocookie.net/atownshiptale_gamepedia_en/images/0/0f/Glyph_Rod-Medium.png/revision/latest?cb=20190919162258) | Your go-to for hammers, Mallets and Pickaxes. | 2 12 6 11 1 9 8 3 7 10 4 5 |
| Page 13 | Curled Wooden Handle | 12 [wood](https://townshiptale.fandom.com/wiki/Wood) | [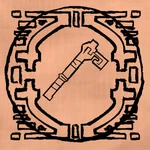](https://static.wikia.nocookie.net/atownshiptale_gamepedia_en/images/9/97/Glyph_Curled-Wooden-Handle.png/revision/latest?cb=20190919162250) | Can be used for Scythes, Axes, and other small tools / weapons. Can be placed on a wall hook. | 6 12 1 4 3 8 9 7 10 2 11 5 |
| Page 14 | Tonfa | 12 [wood](https://townshiptale.fandom.com/wiki/Wood) | [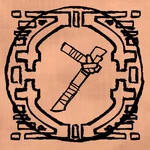](https://static.wikia.nocookie.net/atownshiptale_gamepedia_en/images/d/d0/Glyph_Tonfa.png/revision/latest?cb=20190919162241) | Can be used for swords. | 10 7 9 2 4 11 1 12 6 8 3 5 |
| Page 15 | 10x [Wooden Stakes](https://townshiptale.fandom.com/wiki/Wooden_Stake) | 12 [wood](https://townshiptale.fandom.com/wiki/Wood) | [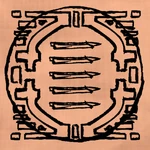](https://static.wikia.nocookie.net/atownshiptale_gamepedia_en/images/9/9f/Glyph_WoodenStake.png/revision/latest?cb=20190919162226) | Can be used for torches, glowing crystals, and other tools just as a medium handle, or basic wooden stick retrieved from wood cutting, only you can stick the [stake](https://townshiptale.fandom.com/wiki/Wooden_Stake) in walls and in the ground. This allows creative tool storage since tools don't stack. | 2 7 10 9 6 3 11 4 1 12 8 5 |
| Page 16 | Medium Straight Handle | 12 [wood](https://townshiptale.fandom.com/wiki/Wood) | [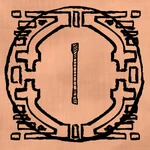](https://static.wikia.nocookie.net/atownshiptale_gamepedia_en/images/f/f2/Mediumstraighthandle.png/revision/latest?cb=20190919162216) | Similar/same length as Medium Rod, 2 sided. | 10 8 6 12 2 4 1 9 11 3 7 5 |
| Page 17 | Medium Branch Handle | 12 [wood](https://townshiptale.fandom.com/wiki/Wood) | [](https://static.wikia.nocookie.net/atownshiptale_gamepedia_en/images/3/3d/Glyph_Handle_Branch_Medium.png/revision/latest?cb=20190919161837) | Can be used for a double sided pommel \ large sword | 8 1 3 10 4 2 6 12 11 9 7 5 |
| Page 18 | Fancy Shield Middle | 12 [wood](https://townshiptale.fandom.com/wiki/Wood) | [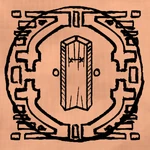](https://static.wikia.nocookie.net/atownshiptale_gamepedia_en/images/c/c4/Fancyshieldmiddle.png/revision/latest?cb=20190920161928) | A middle piece for a crafted shield, attaches to the Shield Handle. | 12 1 11 6 4 3 9 7 10 8 2 5 |
| Page 19 | Plain Shield Middle | 12 [wood](https://townshiptale.fandom.com/wiki/Wood) | [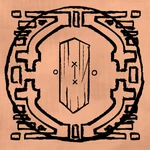](https://static.wikia.nocookie.net/atownshiptale_gamepedia_en/images/0/08/Plainshieldmiddle.png/revision/latest?cb=20190920161956) | A middle piece for a crafted shield, attaches to the Shield Handle. | 8 1 6 2 12 3 10 11 4 7 9 5 |
| Page 20 | Plain Shield Middle with notches | 12 [wood](https://townshiptale.fandom.com/wiki/Wood) | [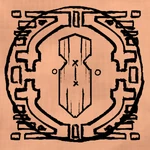](https://static.wikia.nocookie.net/atownshiptale_gamepedia_en/images/4/4a/Plainshieldmiddlewithnotches.png/revision/latest?cb=20190920162011) | A middle piece for a crafted shield, attaches to the Shield Handle. Has notches that you can see through. | 7 2 11 3 10 9 1 12 8 4 6 5 |
| Page 21 | Shield Round Side | 12 [wood](https://townshiptale.fandom.com/wiki/Wood) | [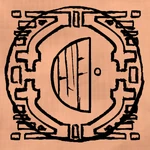](https://static.wikia.nocookie.net/atownshiptale_gamepedia_en/images/e/e1/Shieldroundside.png/revision/latest?cb=20190920162025) | A side piece for a crafted shield, attaches to the Shield Middle piece. Spikes can be placed on the front or back of the shield piece. | 12 1 2 10 9 8 4 11 6 3 7 5 |
| Page 22 | Shield Round Side with notches | 12 [wood](https://townshiptale.fandom.com/wiki/Wood) | [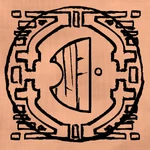](https://static.wikia.nocookie.net/atownshiptale_gamepedia_en/images/d/d0/Shieldroundsidewithnotch.png/revision/latest?cb=20190920162204) | A side piece for a crafted shield, attaches to the Shield Middle piece. Spikes can be placed on the front or back of the shield piece. Has a notch for viewing or striking through. | 7 2 4 3 1 8 6 11 9 10 12 5 |
| Page 23 | Shield Flat Side with notch | 12 [wood](https://townshiptale.fandom.com/wiki/Wood) | [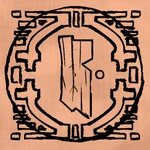](https://static.wikia.nocookie.net/atownshiptale_gamepedia_en/images/5/59/Shieldflatsidewithnotch.png/revision/latest?cb=20190920162217) | A side piece for a crafted shield, attaches to the Shield Middle piece. Spikes can be placed around the outside edge. | 8 1 11 2 9 10 3 7 6 4 12 5 |
| Page 24 | Shield Flat Side | 12 [wood](https://townshiptale.fandom.com/wiki/Wood) | [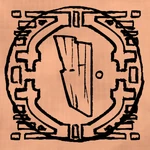](https://static.wikia.nocookie.net/atownshiptale_gamepedia_en/images/5/55/Shieldflatside.png/revision/latest?cb=20190920162227) | A side piece for a crafted shield, attaches to the Shield Middle piece. Spikes can be placed around the outside edge. | 11 7 12 6 3 9 1 8 2 4 10 5 |
| Page 25 | Spiked Club | 18 [wood](https://townshiptale.fandom.com/wiki/Wood) | [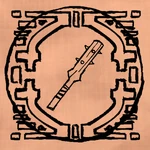](https://static.wikia.nocookie.net/atownshiptale_gamepedia_en/images/9/99/Glyph_Large-Spiked-Wooden-Club.png/revision/latest?cb=20190919161823) | A rudimentary weapon, better than a practice sword. Deals blunt damage. | 12 6 11 10 3 7 4 8 2 9 1 5 |
| Page 26 | Long Rod | 18 [wood](https://townshiptale.fandom.com/wiki/Wood) | [](https://static.wikia.nocookie.net/atownshiptale_gamepedia_en/images/0/0c/Glyph_Rod_Long.png/revision/latest?cb=20190919161811) | Can be used to create hammers, pickaxes, axes, and the likes. Using a tool or weapon with a Long Rod and using only one hand causes it to lose durability faster. | 2 10 6 11 1 8 9 3 4 12 7 5 |
| Page 27 | Long Straight Handle | 18 [wood](https://townshiptale.fandom.com/wiki/Wood) | [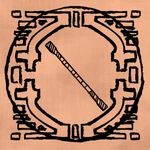](https://static.wikia.nocookie.net/atownshiptale_gamepedia_en/images/a/ae/Longstraighthandle.png/revision/latest?cb=20190919161801) | Can also be used to create hammers, pickaxes, axes, and similar tools and weapons just like the Long Rod. Using anything created with this one handed causes it to decay / lose durability faster. Also looks like a bo staff. | 6 9 4 11 12 1 3 10 8 7 2 5 |
| Page 28 | Branch Handle | 18 [wood](https://townshiptale.fandom.com/wiki/Wood) | [](https://static.wikia.nocookie.net/atownshiptale_gamepedia_en/images/5/57/Glyph_Handle_Branch.png/revision/latest?cb=20190919161733) | Good for sickles and voulge. | 3 9 6 2 11 8 7 10 12 1 4 5 |
| Page 29 | Bow Handle | 18 [wood](https://townshiptale.fandom.com/wiki/Wood) | [](https://static.wikia.nocookie.net/atownshiptale_gamepedia_en/images/5/5d/Glyph_Bow_Handle.png/revision/latest?cb=20190919161719) | Requires a dried grass bundle to complete. | 12 10 7 9 3 4 2 11 1 6 8 5 |
| Page 30 | 20x [Arrow Shafts](https://townshiptale.fandom.com/wiki/Arrow_Shaft) | 18 [wood](https://townshiptale.fandom.com/wiki/Wood) | [](https://static.wikia.nocookie.net/atownshiptale_gamepedia_en/images/0/0c/Arrowshafts.png/revision/latest?cb=20190919161705) | Arrow shafts, to create crafted arrows. | 3 9 8 10 2 11 12 6 7 1 4 5 |
| Page 31 | Training Sword | 18 [wood](https://townshiptale.fandom.com/wiki/Wood) | [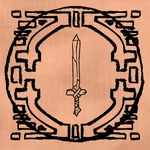](https://static.wikia.nocookie.net/atownshiptale_gamepedia_en/images/f/f5/Trainingsword.png/revision/latest?cb=20190919161654) | A practice sword, or a last resort of a weapon. | 7 10 3 9 1 11 8 4 12 6 2 5 |
| Page 32 | Sling Shot | 12 wood | [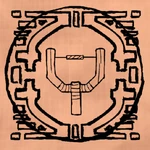](https://static.wikia.nocookie.net/atownshiptale_gamepedia_en/images/b/b3/Slingshot_glyph1.png/revision/latest?cb=20200319075100) | Used to slingshot a number of items such as [Turabada shards](https://townshiptale.fandom.com/wiki/Turabada_Shard) or [Gotera spores](https://townshiptale.fandom.com/wiki/Gotera_Spore), or just plain item bags. | 4 9 1 3 6 8 11 7 10 12 2 5 |